This is the next article in the series about our "Flower Machine".
Just a quick one: Let's talk about some of the mechanical design elements in the Flower Machine project.
Frame Construction
The first thing any machine needs is a sturdy frame. This frame provides mounting points for all other equipment. It is the baseline for the success of the project, as a bad machine frame will lead to problems in all other areas further down the line. So what makes a good frame?
- It needs to be as rigid as possible. An ideal machine frame would be perfectly rigid and mounted components would stay perfectly in place as forces are applied. In the real world, of course, everything will move in response to forces by some amount. To find a trade-off, reinforce the frame in specific places such that critical dimensions are kept accurate. Related to this, you also need to consider forces excerted on the frame by an uneven surface ontop of which the machine is standing.
- It needs to allow precise positioning of mounted equipment. You want to focus on getting your process working, not constantly dealing with problems of misaligned components.
- Tying into the previous point, it should be possible to adjust positions of all components. There are always slight manufacturing tolerances and to deal with them, by far the easiest solution is to allow adjusting the alignment of everything in some way.
- Especially for projects of this kind, the frame should be modular such that modifications are easily possible in the future. As the project evolves, certain unforeseen changes or extensions will be necessary and it is best if those are easily possible.
Of course, these objectives have different priorities on each machine. Some will need much higher precision while others need to be able to deal with much larger forces. Depending on this, different frame construction solutions will best fit the application.
For the Flower Machine, flexibility and cost were the driving factors. We needed a solution where changes are very easy to make because we were still somewhat figuring things out as the project progressed. As you have probably already seen in the pictures of the machine, we decided to build it entirely using slotted aluminum extrusions. These are standardized extrusions which can be joined into arbitrary frame geometries and allow very easy and flexible mounting of equipment.
Aluminum Extrusions
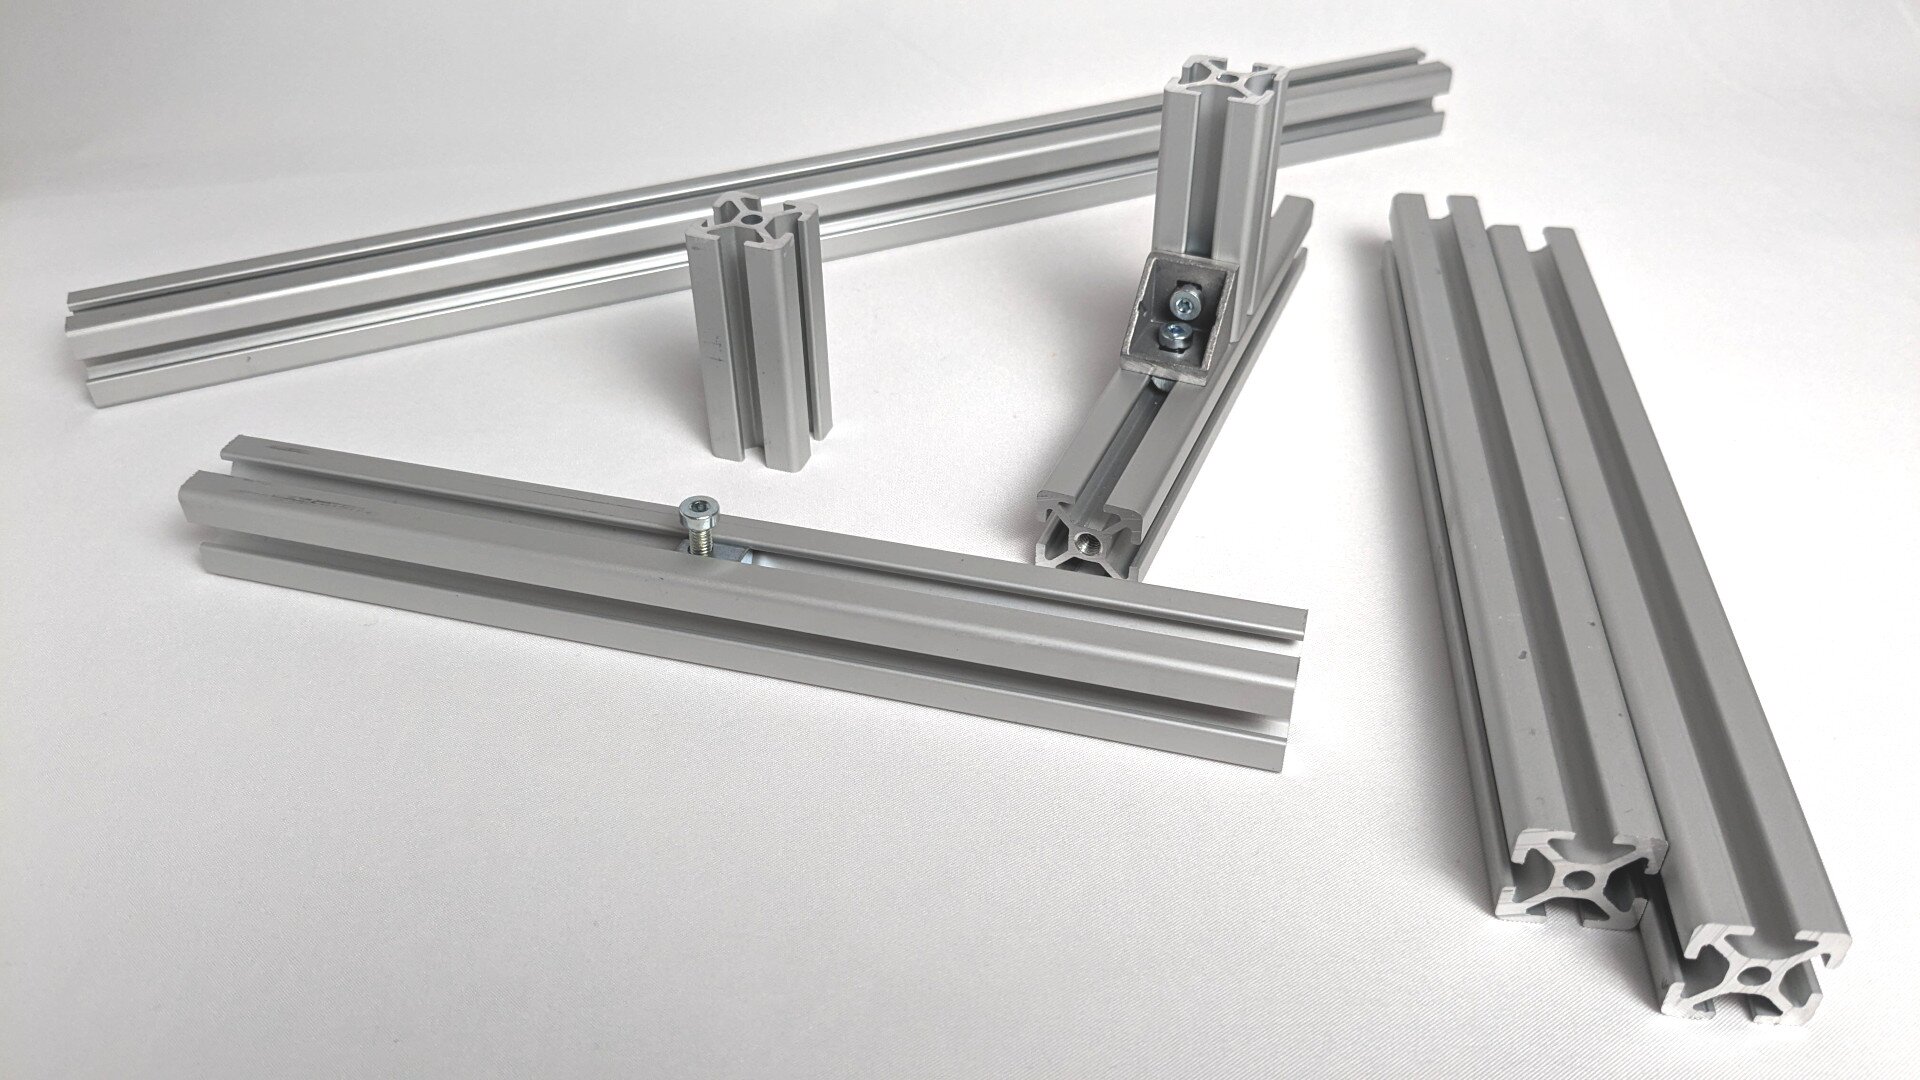
Here is a quick primer on these extrusions:
-
They come in different sizes, for example, 20x20mm, 30x30mm, or 40x40mm.
-
They have slots on all sides where components can be mounted using special slot nuts. The slot nuts can be moved along the length of the slot to adjust their position.
-
There are slight differences in the exact profile, depending on the manufacturer. Sadly this means that they are not 100% compatible. There are two leading standards, one by item and one by Bosch Rexroth. Let's call them I-type and B-type here to avoid confusion. Here's a table comparing the characteristic dimensions:
Size I-Type Slot Width I-Type Center Bore B-Type Slot Width B-Type Center Bore 20x20mm 5mm M5 6mm M6 30x30mm 6mm M6 8mm M8 40x40mm 8mm M8 - - 45x45mm - - 10mm M12 My suggestion: Choose one system and stick to it for everything you do.
-
Beyond the different sizes, there are variants of these extrusions available. For example 20x40mm, with two slots along the longer sides. Or variants with some sides fully covered (no slot) for cleaner looks and dust trap prevention.
-
The slot nuts are also an important topic: For B-Type extrusions, for example, two variants exist: One can only be inserted into the slot at the end of the extrusion and the other can be twisted into position anywhere along the length. Make sure to check what your chosen system has to offer.
-
To get anything useful built from these aluminum extrusions, you'll need corner brackets for attaching extrusions to each other. Again, there are a lot of different options available, each optimized for different use cases. Some are more permanent and require drilling holes into the extrusions. Others are attached using only slot nuts which means they can be moved and adjusted at will.
When using aluminum extrusions, here are a few tips that I have learned:
-
Standardized Lengths: For the Flower Machine, we didn't think much about the lengths of the extrusions and just chose with whatever worked best in each case. Then we got all extrusions cut to those custom lengths and built the machine. However, there is a much better way to do this: Pick a small number of standardized lengths and always design your frames using those lengths only. This has several advantages:
- You can just keep those standard lengths "in stock" and thus there is less effort in acquiring the required parts.
- The extrusions are always reusable as you'll use the same lengths again in the next project.
- Your bill of materials (BOM) gets a lot shorter and easier to manage when you don't work with a million custom-sized extrusions.
-
Diagonal reinforcement: There are 45-degree angled brackets available which allow easily building diagonal reinforcements. These work wonders for helping with frame rigidity as discussed above.
-
Cable-organizer mounting brackets: For routing cables and tubes along the frame, small zip-tie or velcro mounting brackets which clip into the extrusion slots work wonders. And here's a shameless self-advertisement: I published a 3d-printable design for such a mount: I-Type 2020 Universal Cable Mount
Brackets, Brackets, Mounting Brackets
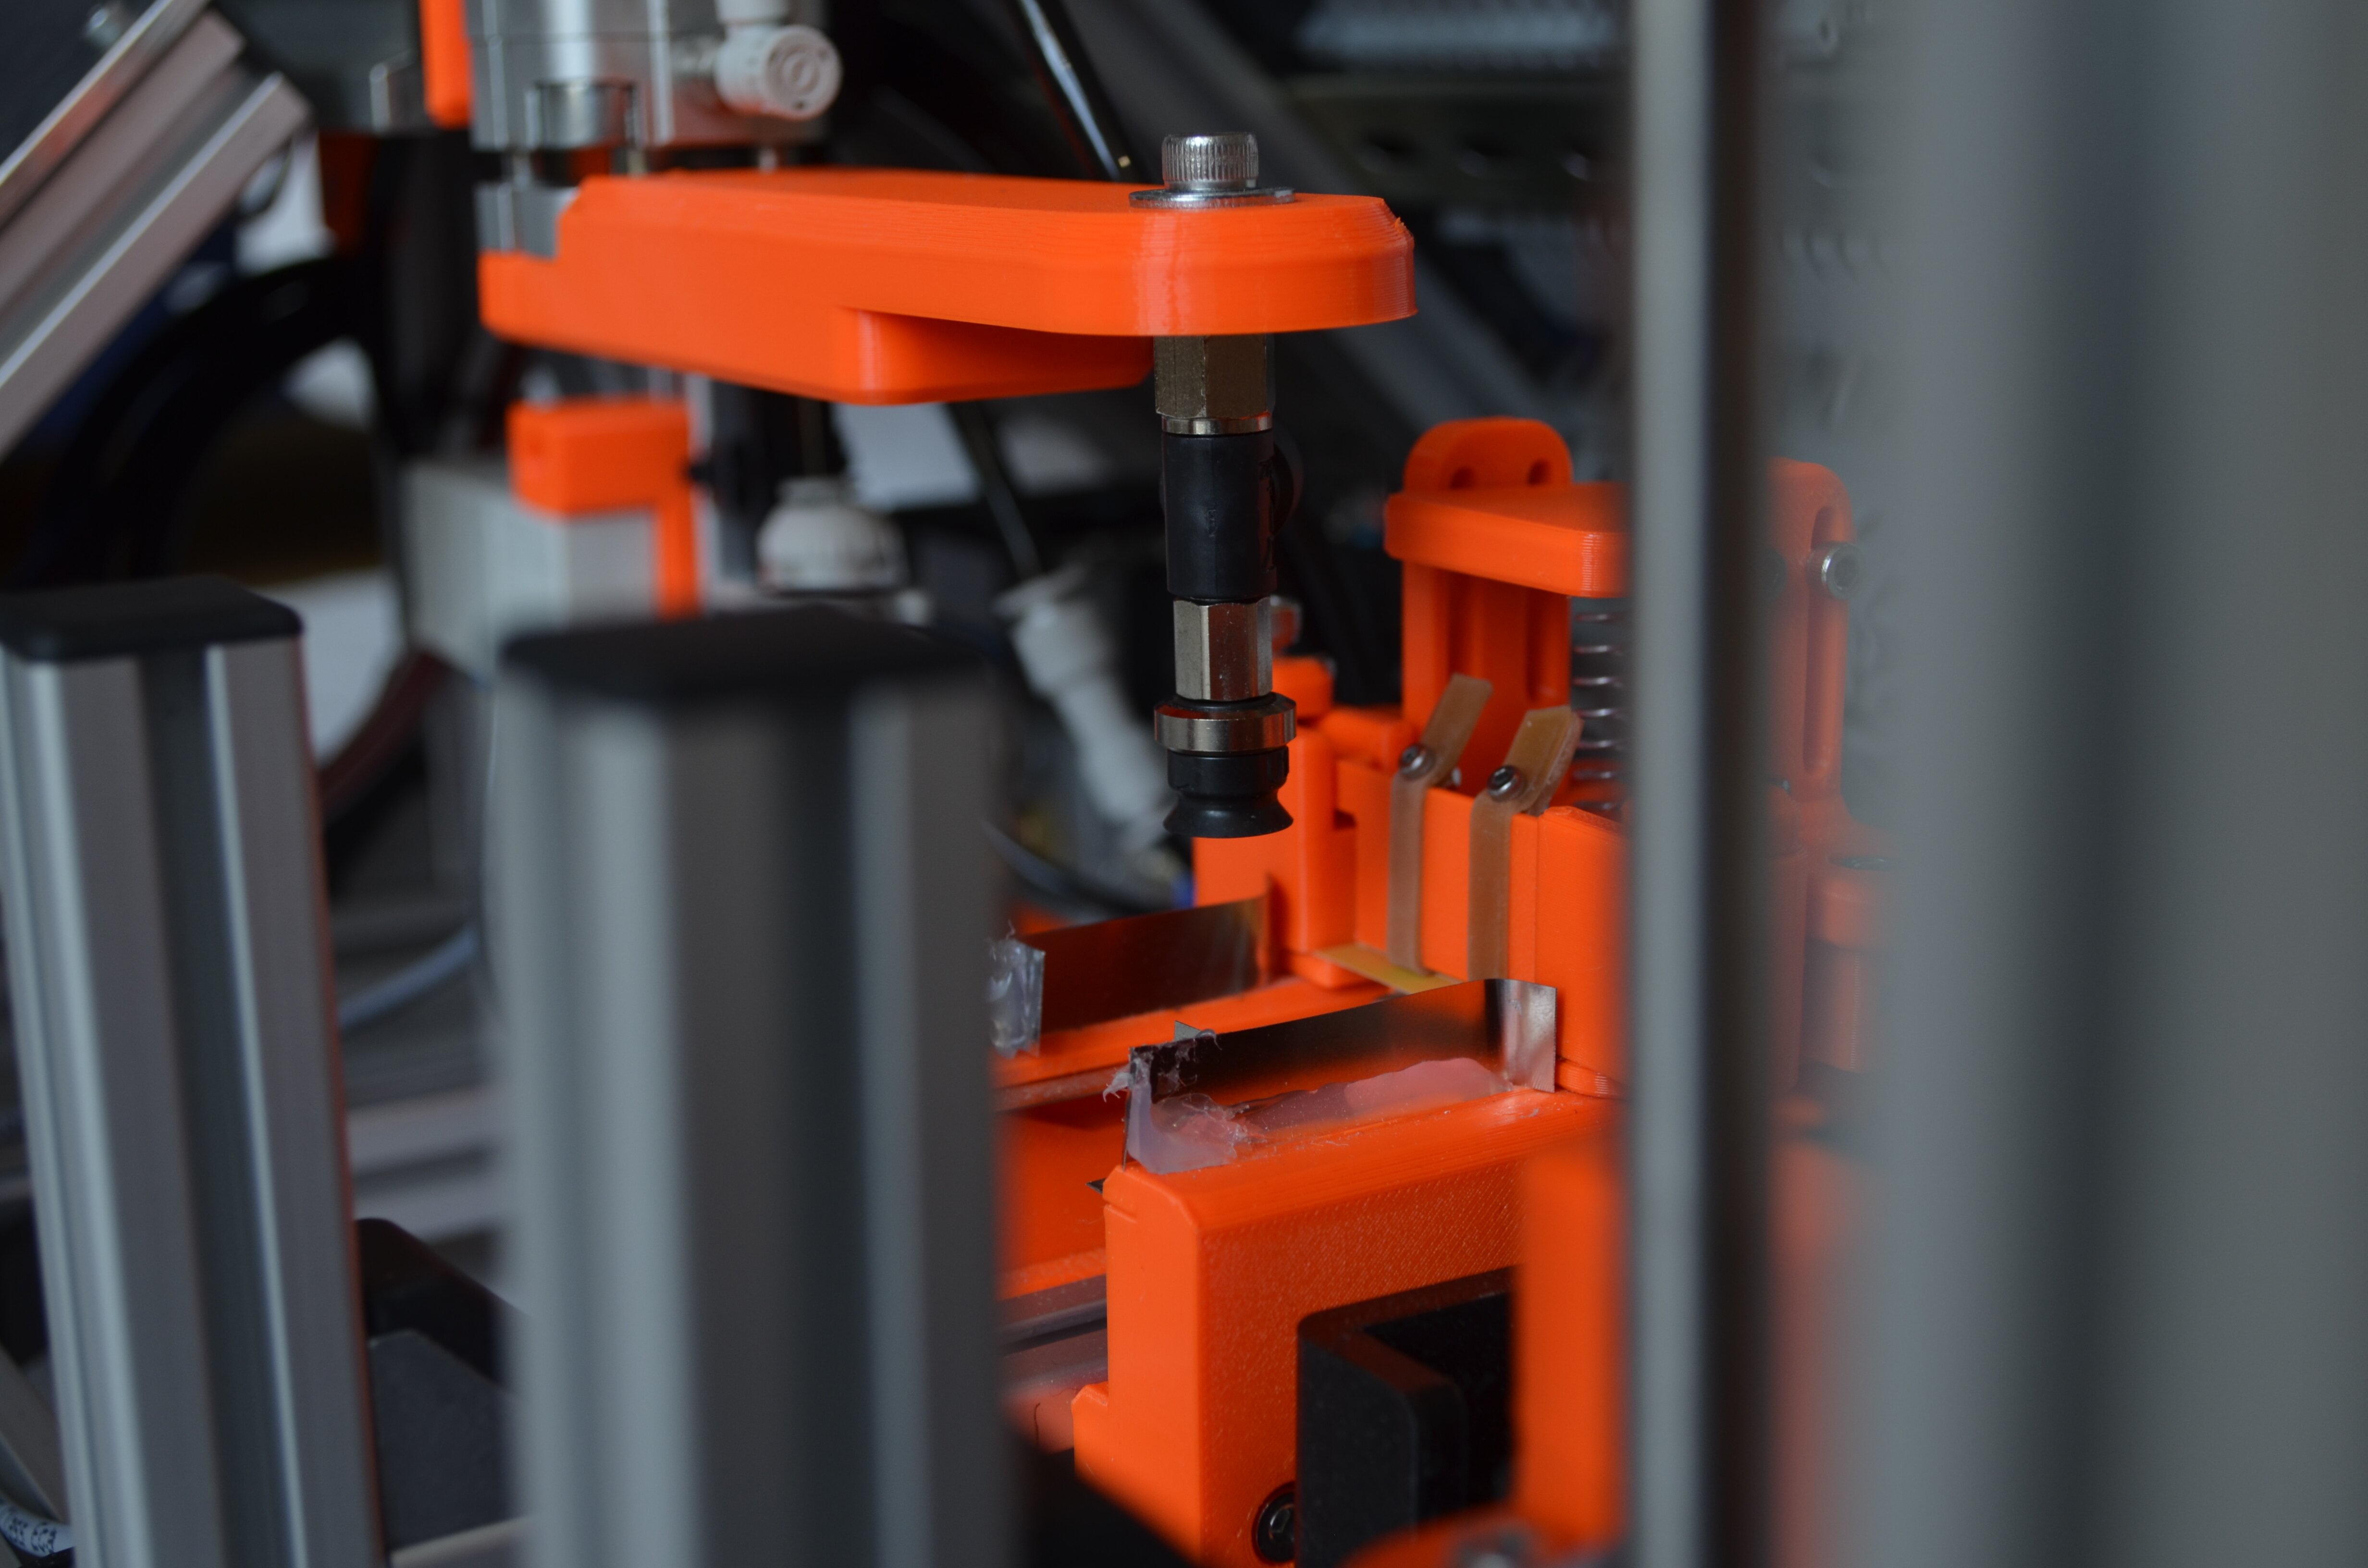
The frame built from aluminum extrusions gets you quite far, but certainly not all the way: You will inevitably need some custom parts to get everything mounted. Traditionally, these mounting brackets are machined from aluminum. But for the Flower Machine, this would have blown the budget by a large margin. So an alternative was needed...
Fortunately, there is a new player on the field who is up to the task just as well in many regards: 3D-Printing. All custom brackets on the Flower Machine are made from 3D-printed PETG.
3D-Printed Parts
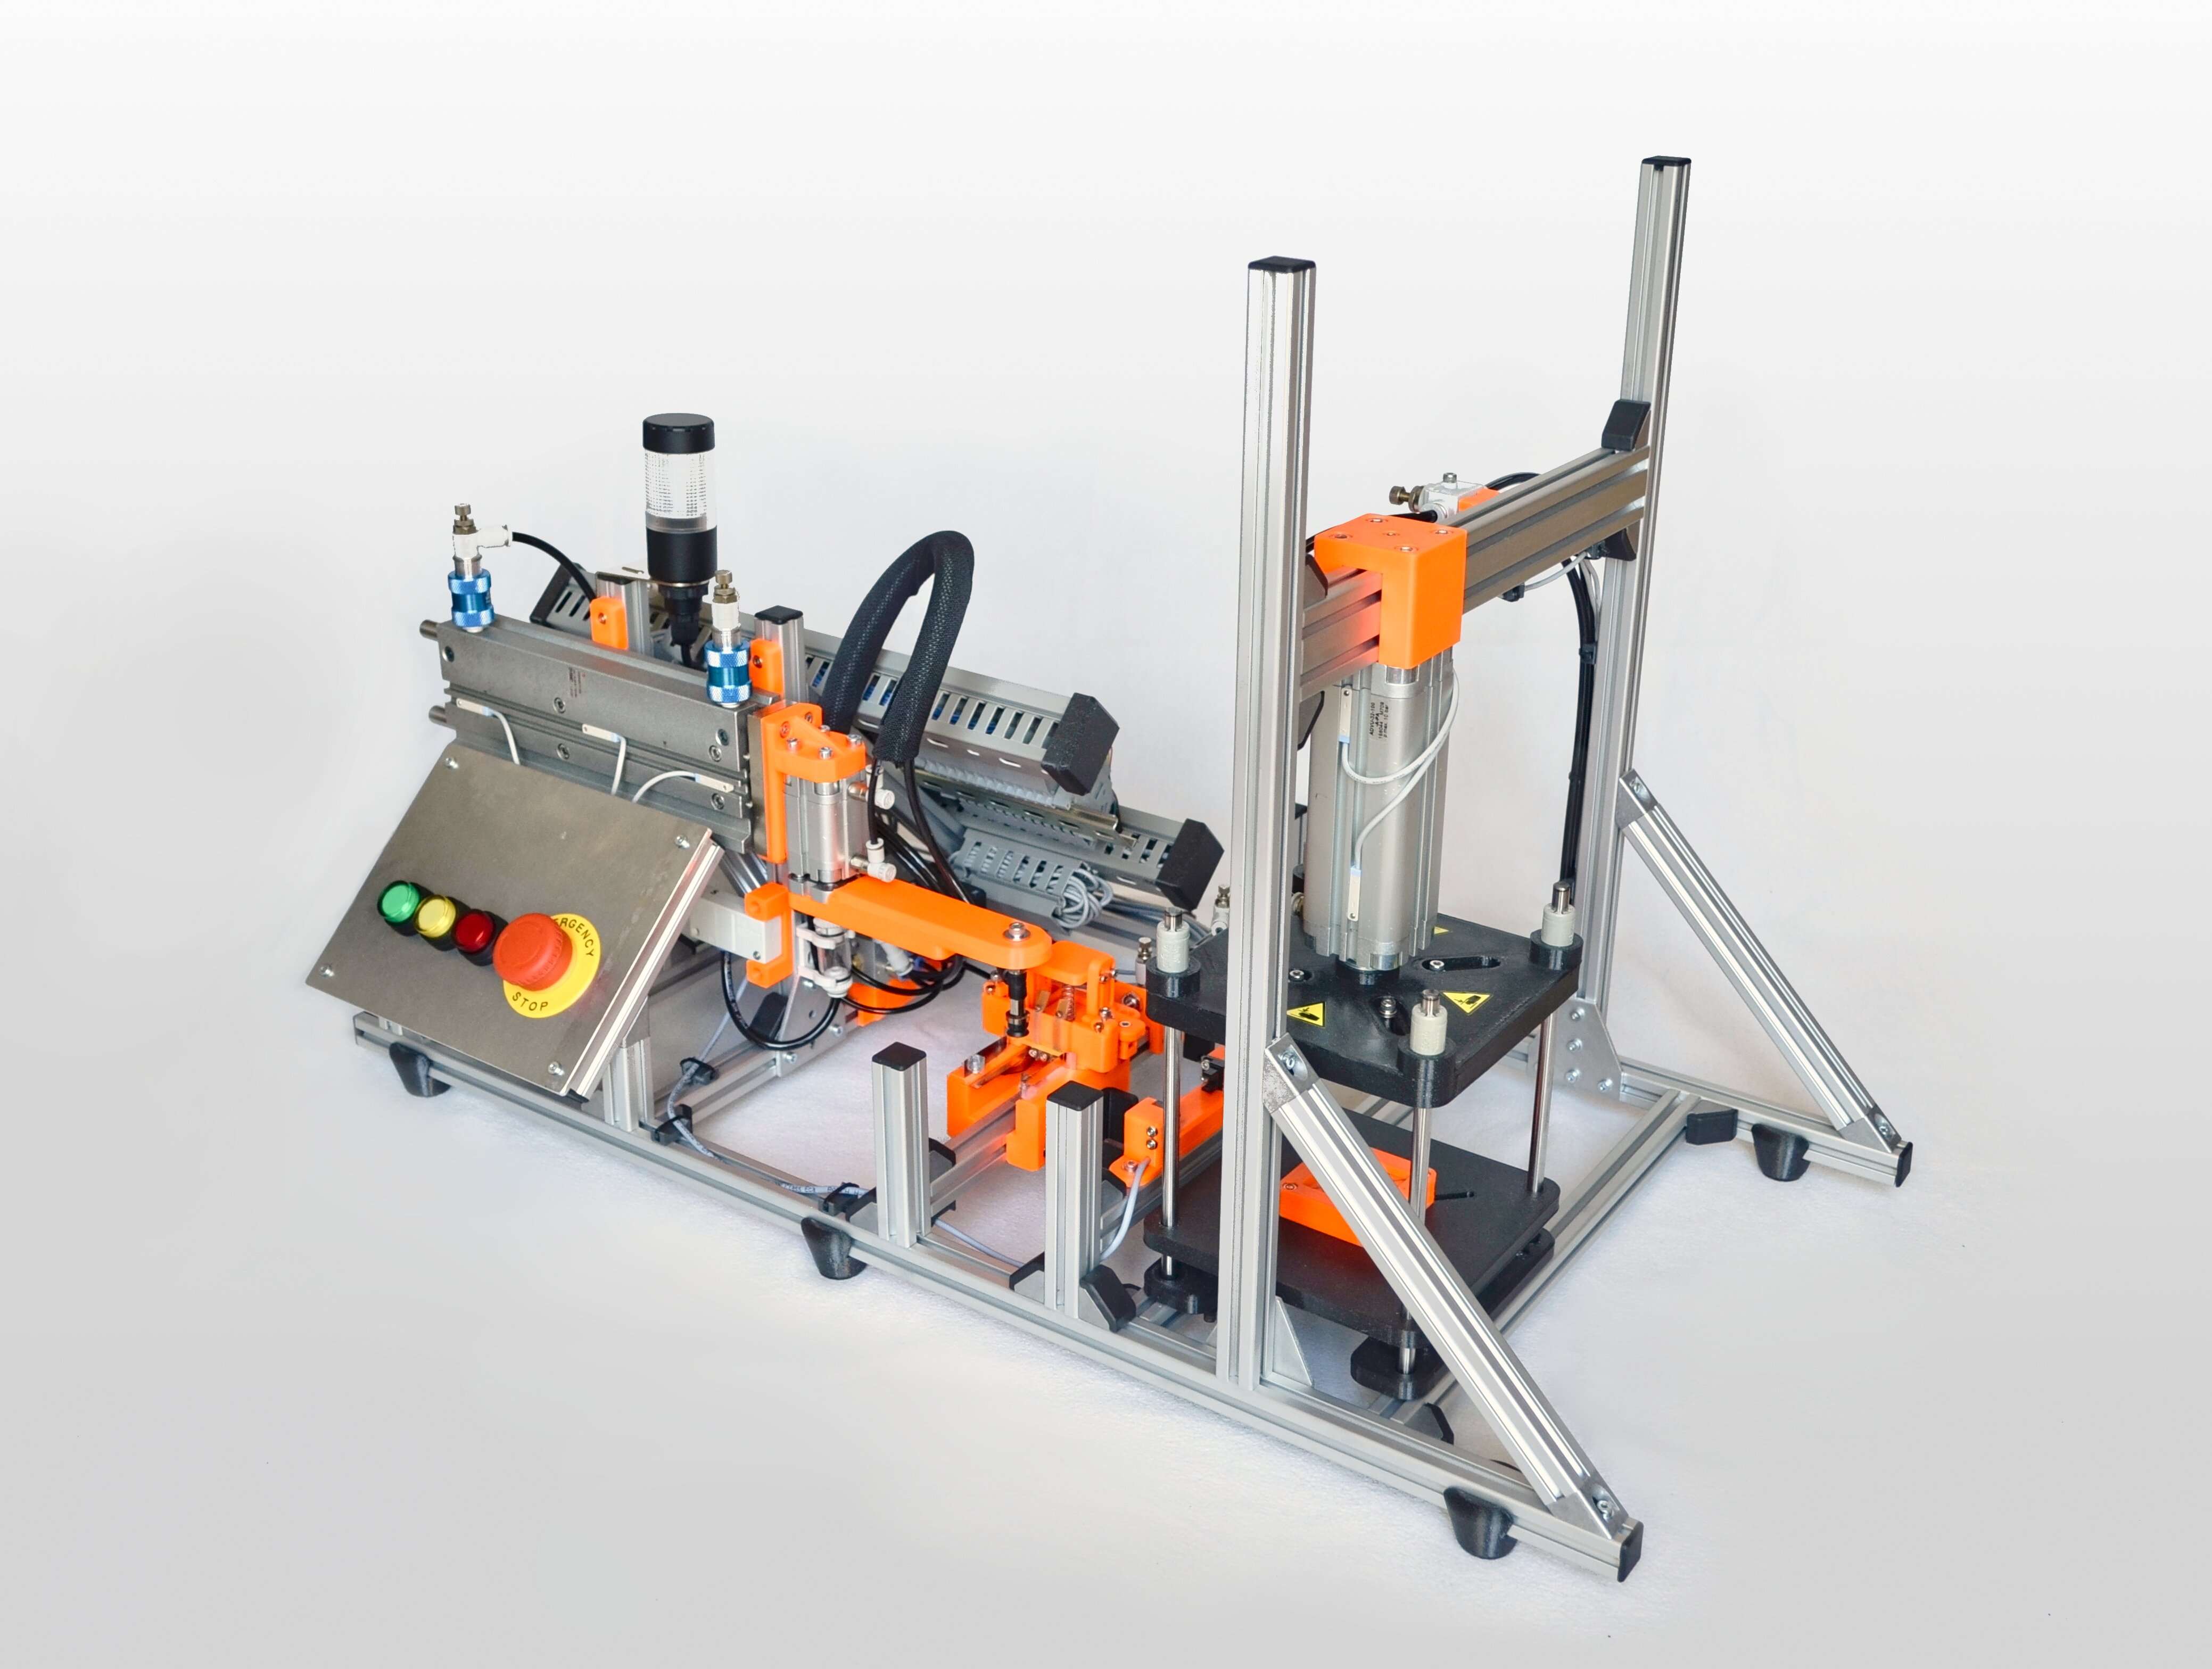
All orange parts you can see here are 3d-printed.
You may be thinking that plastic parts must be strictly inferior to their aluminum counterparts. And it is true, the same part in 3d-printed plastic will certainly show worse properties than machined from aluminum. But this is the wrong way to look at it:
The part needs to fulfill a certain requirement and the goal is purely about this requirement, not about building the strongest part possible. And it turns out that 3d-printed parts can fulfil the necessary design constraints quite well in a lot of situations.
However, there is a big catch to this: You won't be successful by simply taking the same geometry from aluminum and 3d-printing it - you must design your parts with the 3d-printing process in mind if you want them to be up to the task. I will write about this topic in more detail in a later blog post but in general this means that parts need to be more bulky to reach the required stiffness.
You will also notice that achievable tolerances with 3d-printing are much more coarse. This quickly becomes problematic when your machine needs to be accurate to less the printing tolerance. There is, however, a workaround and it lies in the saying
If you can't make it precise, make it adjustable.
That's right, for any dimension with high precision requirements, add an adjustment screw or any other adjustment mechanism to your design. To be fair, this can make the machine a lot more cumbersome to set up, but when the difference compared to precision parts is several orders of magnitude in cost, then the adjustment pain is easy to swallow. On the Flower Machine, adjustment screws were the saving grace of the paper feeding mechanism. I'll write about this in a future blog post as well.
CAD
Let's also talk a bit about the tools used for mechanical design. These days, this is all done digitally, using CAD software. For the Flower machine, we exclusively used FreeCAD, a free and open-source mechanical CAD package.
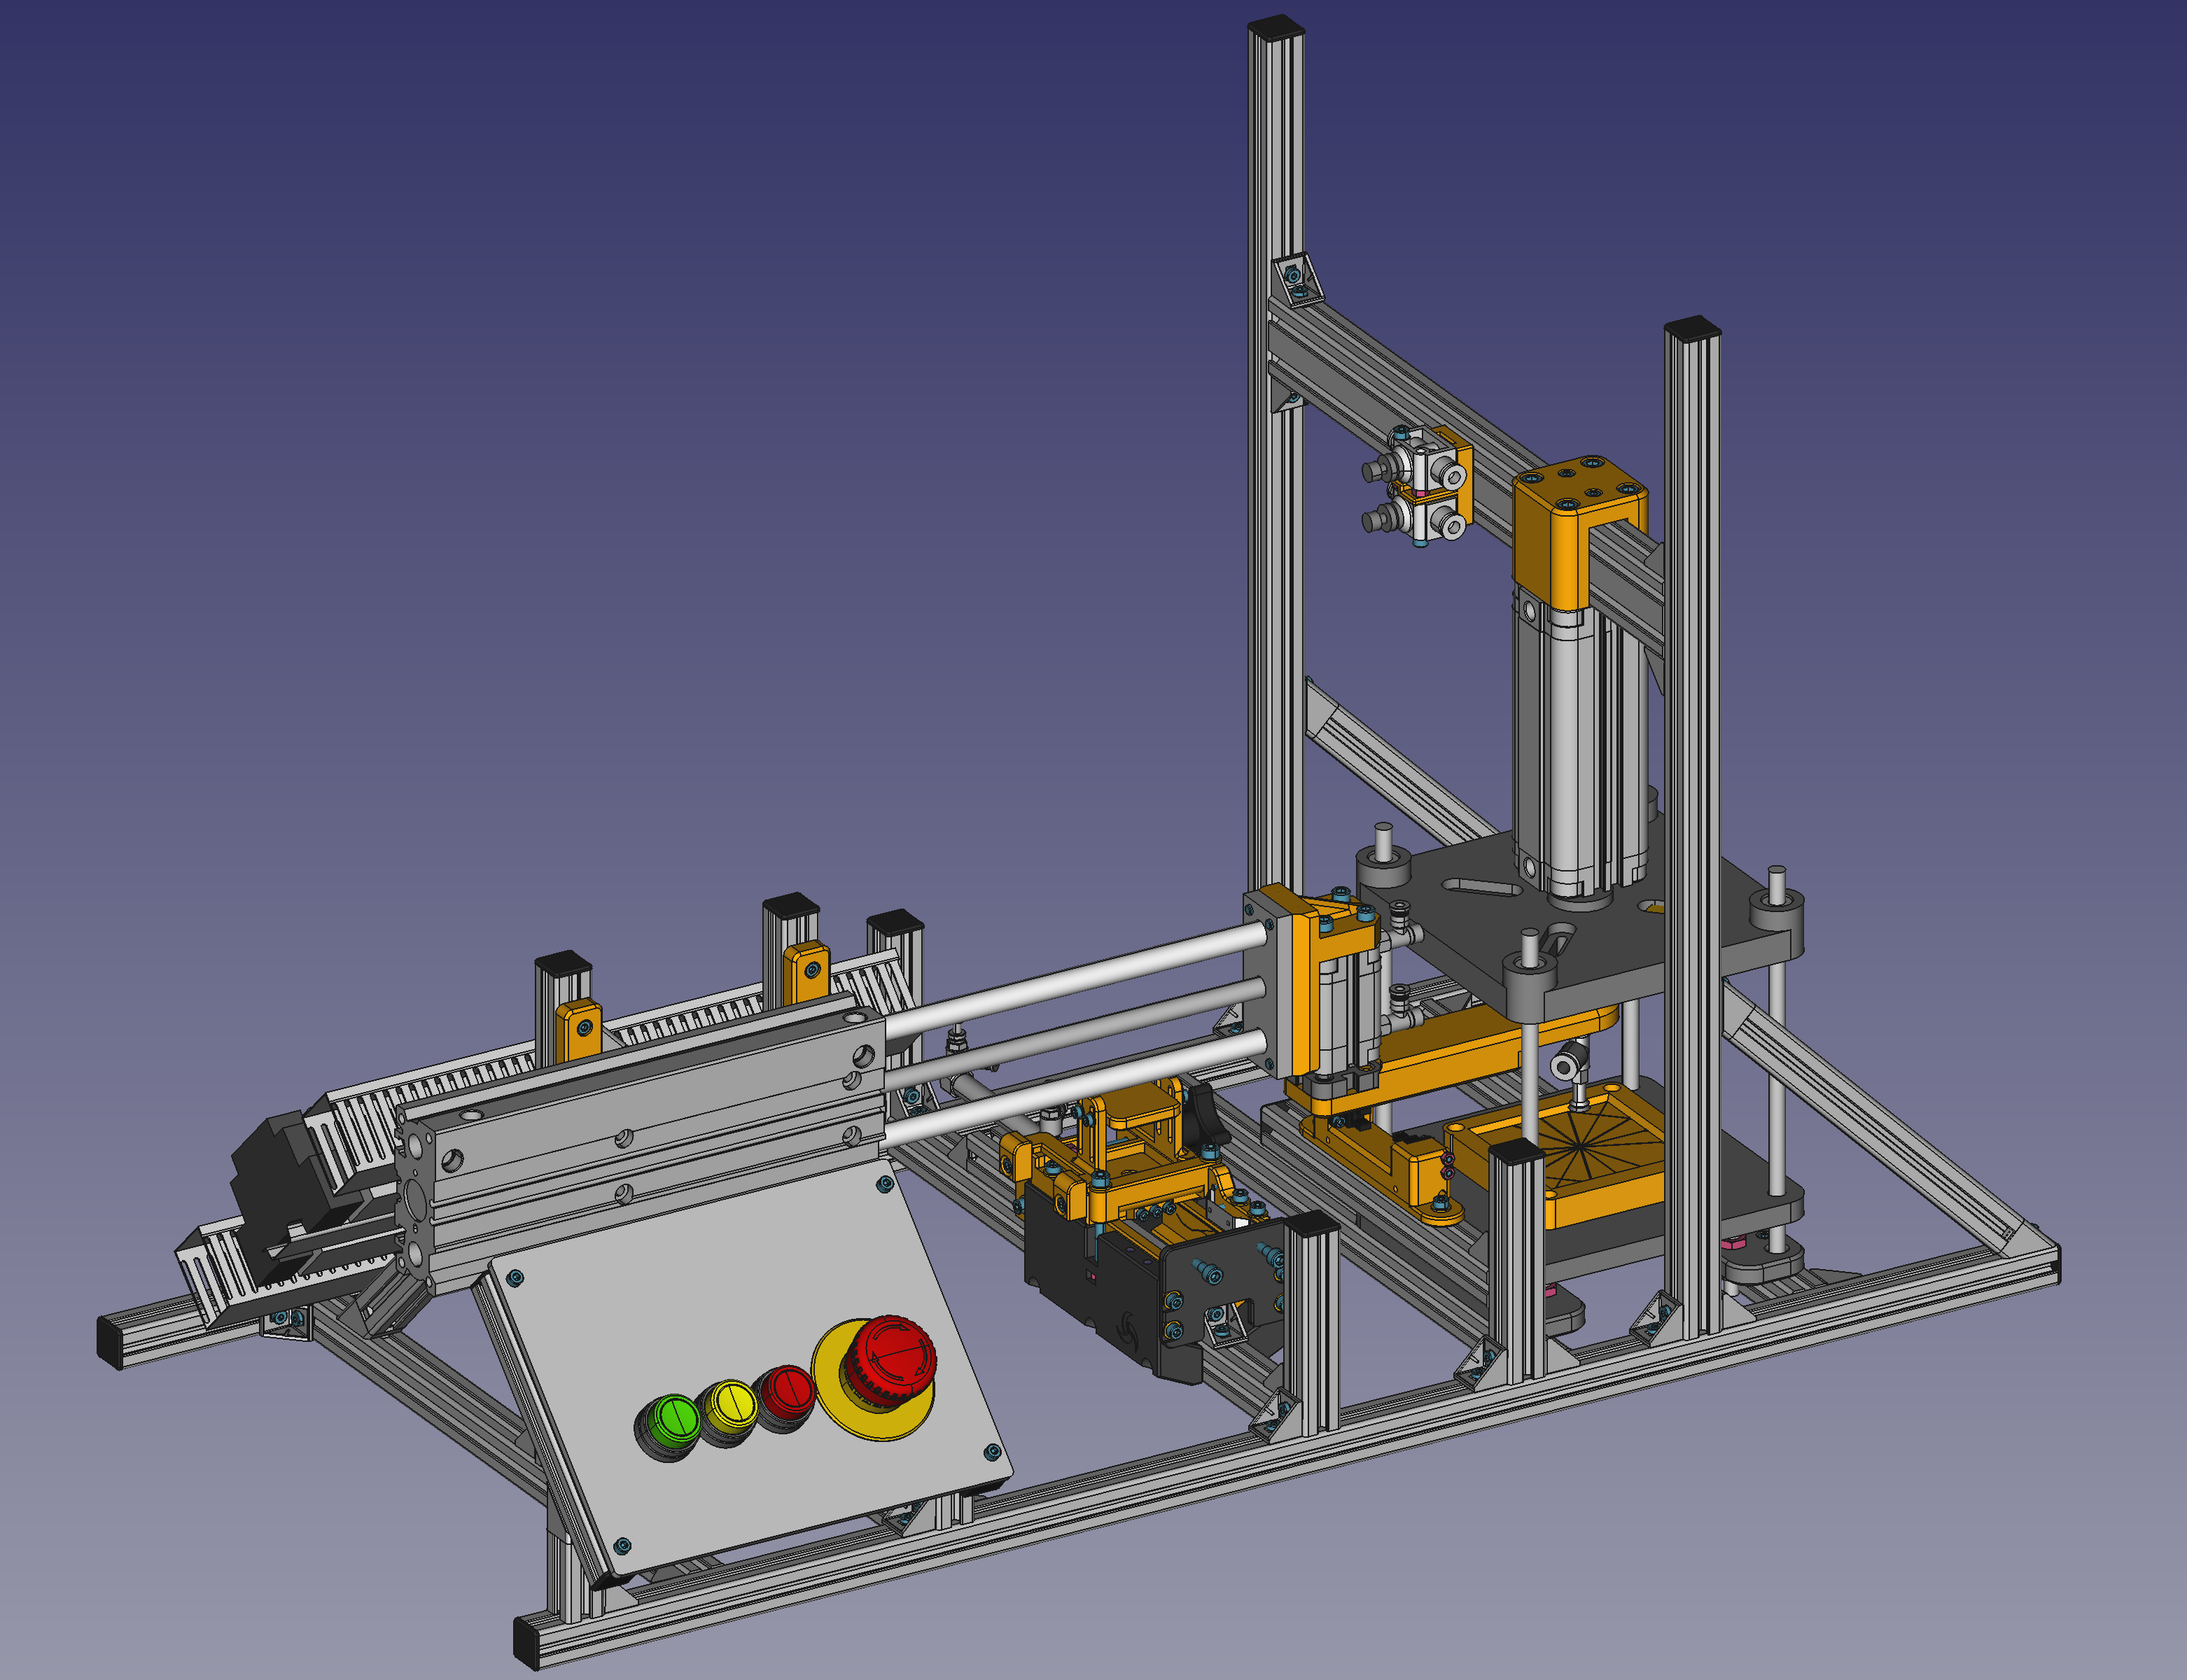
CAD model of the Flower Machine
As you can see, we have a full digital model of the Flower Machine. This helps tremendously while designing parts because it allows you to check them against the remaining assembly before actually manufacturing them in the real world. This leads to fewer iterations of parts and thus less wasted time and material.
For this to work effectively, however, you need to make sure that your digital model is always up to date with the real world. Any changes which are done on the real machine during assembly or while getting the process working need to be reflected in the virtual machine. If you don't manage to keep these two worlds synchronized, the 3D model will become less and less useful over time. We learned this the hard way on a few occasions, where missing details in the CAD model led to parts not working after we printed them.
Think About Assembly
Another big lesson was that just because things fit geometrically in the CAD model does not mean they are easy to assemble in the real world. In extreme cases, some mounting brackets we designed were not possible to assemble at all because screws were already hidden at the time they needed to be tightened.
In general, keep in mind that your sense of scale is completely off when looking at a virtual model. Think about places where hands and tools need to fit. Think about order of assembly. Think about being able to watch what you are doing. Nothing is more annoying than squeezing your hand and an allen key into a tight spot and then feeling around until you hit the screw because you cannot even see it.
Give yourself and the machine all the space it needs. In most situations, it won't hurt to make things a bit bigger. Doing this will save you from a lot of headaches further down the line!
Okay, this post ended up being a bit unstructured but I hope there were still some interesting things to take away from it. If this sparked your interest, head over to the overview of all flower-machine posts to learn more about the project!