I often open pavucontrol to adjust the volumes of different applications relative to each other.
Sometimes music is too loud, sometimes Jitsi sessions are too silent. However, it is annoying to
switch context ever so often just to open the mixer, change volume, close again. As I am always
looking to challenge myself with some useful projects reaching beyond just writing software, this
felt like a great opportunity: I built myself a small mixing desk to control PulseAudio streams with
hardware faders.
Pavu Mixer is what this resulted in. The project is fully free and open-source, including the hardware. It can all be found on GitHub: https://github.com/rahix/pavu-mixer
In this blog entry, I'm going to detail parts of the journey and the architecture of the project.
Hardware
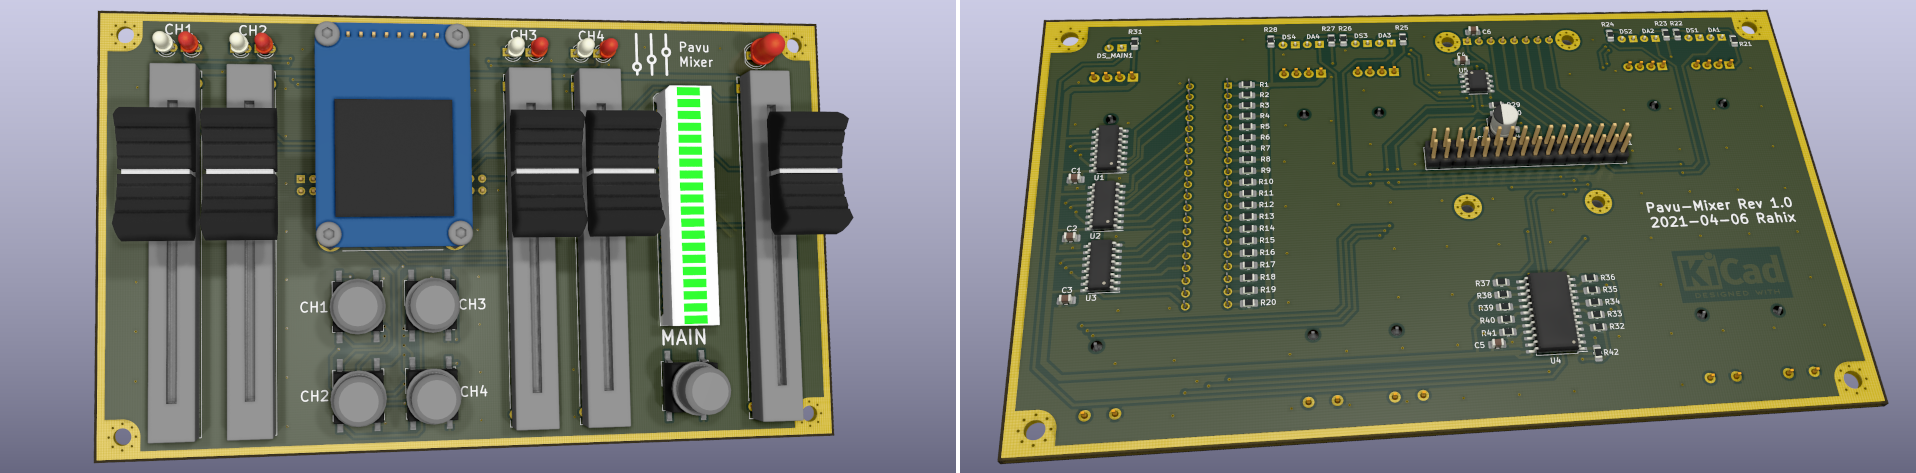
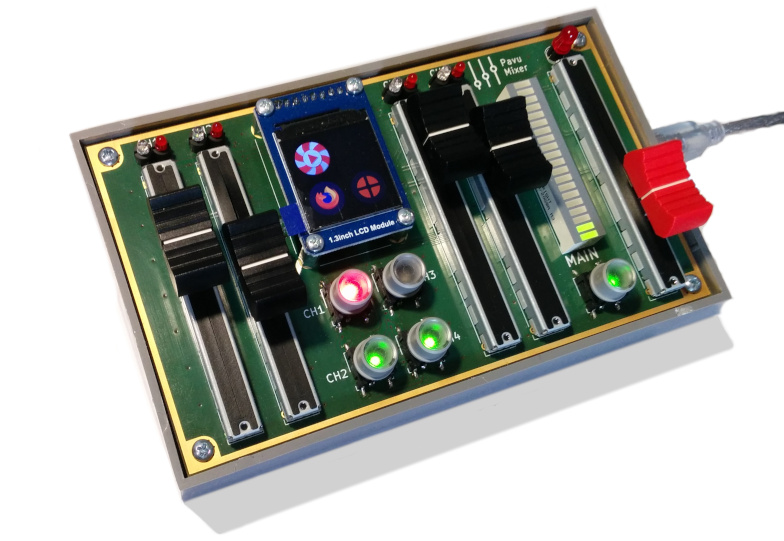
The design is as simple as I could make it: There is a single PCB which houses all the "UI" (= faders, buttons, display, LEDs) on the front and some I2C port expanders and shift registers on the back. To remedy the need of creating a custom front-plate for the enclosure, I chose to also make the PCB take that role: It might look a bit odd, but it makes the mechanical design 100 times easier.
There are 4 application channels and one "main" channel. Each application channel is supposed to control one of the application streams, known as sink-inputs in the PulseAudio world. The main channel then controls the volume of the selected default output; or sink in PulseAudio. All 5 channels come with the same set of IO: One fader for the volume, a mute button with built-in red and green status LEDs, a level indicator, and a red "warning/error" LED. The level indicator is a variable brightness LED (PWM controlled) for the application channels and a 20-segment bar graph for the main channel.
A single 32-pin header is used for connecting the board to a "brain" - in this case an STM32F3DISCOVERY. I chose this board as I already had some around, because it already comes with the MCU's USB device peripheral all wired up, and lastly because I know it has good Rust support already.
There isn't much to say here - the hardware is extremely simple and nothing notable went wrong. Except for one major annoyance: I thought it would be a great idea to invent a custom pinout for the pin-header. That's quite alright if you're also designing the board on the other side of the connection, but as I am using an off-the-shelf devboard, I have no control over its pinout. This meant I had to build an adapter cable matching up pins on the Pavu Mixer side with pins of the discovery headers. I could have easily avoided this by just designing my board to plug right on top of the discovery, with my pinout matching theirs. Well, lesson learned for next time...
3D Models of Components
One thing I do briefly want to mention is how I created the 3D models of components which KiCad didn't yet know. I experimented with CadQuery for this, and I found the workflow to be extremely pleasant. CadQuery is a Python library which allows you to build up 3D models purely from code. As someone with mostly software background, this felt super natural and iterating on the models is quick and easy.
The sources to all my models can be found in the Hardware/3D/src/ subdirectory of
the git repository and are MIT licensed.
USB
I decided to try my hands on rolling a custom USB class for communication. On one hand this gave me an opportunity to explore the state of USB in Rust, and on the other I got to dig into some lower level USB layers I am not usually looking at.
I have to say, with the rusb crate on the host-side and the usb-device on the device-side,
it was smooth sailing. The only part which I am missing is some form of asynchronous transfers in
rusb. But I do see why they're still missing, and I think if I really needed them, either a
workaround using threads or directly calling into libusb would have worked well enough.
Here's a list of things I took away from this:
-
As everywhere else, separate mechanism from policy. The USB device should just implement mechanisms, in this case to set LEDs, write to the display, and read out faders & buttons. What those buttons and faders and everything else actually means, so for example the policy of when to light up an LED - this should be implemented on the host side.
By doing this separation, you will need to change your firmware much less often. The mechanisms will be much more stable and will need much less tweaking than the policies of assigning meaning and roles to everything.
-
The USB device is strictly a subordinate. USB transfers are always initiated by the host. A place where this is really important is Interrupt Transfers. While they do have reserved bandwidth, they will only ever actually happen when the host requests them. So ideally your application should continuously trigger interrupt transfers to always give the device a chance to report its state.
Similarly, the device should then use those interrupt transfers as efficiently as possible when it gets the chance for one. So write firmware to always send the most recent data when sending, instead of naively blocking on the first data until it is sent (this of course heavily depends on what that data is).
-
The bus doesn't have a notion of an application attaching to/detaching from an interface. Your device must be robust against the host-side application disconnecting and reconnecting minutes/hours later. Again, the device won't know of the disconnect (except for no more transfers happening) and also won't notice the reconnect (except by transfers happening again).
The place where this matters most is internal buffers in the firmware: Do be prepared for those buffers overrunning when the host stops reading from them. A common example of where this goes wrong is USB-serial implementations. They often break when closing the host-side terminal, because the internal TX buffer on the device overruns.
The actual data sent over the wires in my custom USB class is serialized using the postcard
crate. This is something where Rust is really amazing: I created a small common
crate which is shared between firmware and host-application which defines the data
types for communication. postcard then transparently handles serialization, and because the
messages are encoded as enums, the compiler verifies that I actually handle all possible messages
correctly.
Async/Await is amazing for firmware!
I didn't want to go with a full-blown RTOS because the functionality of the board is so simple.
However, as it grew, I wanted to split it into different modules which each take care of one single
thing. I found that using async/await with James Munns' cassette is a perfect way to
split my firmware's clunky big main loop into many independent loops running "in parallel". Of
course they are still running in series, but interleaved with each other and I can write them as
if they were independent. In essence, it looks like this:
async fn usb_task(...) -> ! {
    // usb setup
    loop {
        // usb loop
        cassette::yield_now().await;  // now let the other loops run
    }
}

async fn faders_task(...) -> ! {
    // ADC setup
    loop {
        // read ADC and write result to "shared buffer".
        cassette::yield_now().await;  // now let the other loops run
    }
}

fn main() -> ! {
    let usb_task = usb_task(...);
    futures_util::pin_mut!(usb_task);

    let faders_task = faders_task(...);
    futures_util::pin_mut!(faders_task);

    let all_tasks = async {
        // join!() all tasks to poll them one after the other indefinitely.
        futures_util::join!(usb_task, faders_task);
    };
    futures_util::pin_mut!(all_tasks);

    let c = cassette::Cassette::new(all_tasks);
    c.block_on();
    unreachable!();
}
This pattern made it super easy to write clean separated loops for each of the different components
the firmware has to take care of. For "communicating" between them, I used Cells and
RefCells containing data structures from the heapless crate.
As an example, the faders task will check if a fader changed position since the last iteration. If
it did, it will store the new value in a LinearMap by the index of the
channel. The USB task then iterates over all entries of the LinearMap, trying to send them to the
host and removing an entry if successful.
The use of async also allowed my to easily wrap some polling operations into an async fn() to keep
the loop code simpler. Check send_device_message_async() for an
example of that.
Importantly: Yes, I still query the I2C bus blockingly, and yes the SPI writes for the display are also blocking. But you can still benefit from async greatly, even without going all the way and making everything non-blocking! Putting it differently: It is a nice way to implement cooperative multi-tasking, provided by the compiler essentially for free.
The pain of PulseAudio interaction
A different story was the "async" interface of PulseAudio in the host-side daemon. PulseAudio uses a
callback based API which does not lend itself well for Rust. I had quite a bit of trouble getting
this to work the way I wanted. I ended up writing a wrapper layer which hides all the callback-code
and just provides the "user" with a stream of Events. Those are sent from the
callbacks into a standard std::sync::mpsc::channel().
Another pain point was the fact that the libpulse-binding crate is implicitly
unsafe (which seems to be intentional, see libpulse-binding#27 and
libpulse-binding#30). This means that you can trigger undefined
behavior and memory bugs from entirely safe downstream code. I was quite busy trying to understand
which invariants I need to uphold for my code to not constantly crash. In the beginning, it
would always segfault on panic because I had forgotten to destruct the PulseAudio context properly.
The following piece of code proved to be invaluable:
impl Drop for PulseInterface {
    fn drop(&mut self) {
        // SAFETY: Not doing this causes a segfault /o\
        self.context.disconnect();
    }
}
Without it, I couldn't even see panic messages from Rust because the segfault always happened just before those messages and backtraces could be shown.
Application Icons from Gtk
The LCD currently just displays the application icon for the PulseAudio stream attached to it. This
is implemented in host-daemon/src/icon.rs using the Rust GTK bindings. It even takes
your selected icon theme into consideration!
The only problem here is that PulseAudio "sink-inputs" often do not provide accurate icon information. Lots of applications embed Chromium which means I would display the Chromium icon for those streams. To work around this, I added an icon overriding mechanism to the config where you can select alternate icons depending on other properties reported by PulseAudio. As an example:
[[icon-mappings]]
icon = "steam"
[icon-mappings.property-matches]
"application.process.binary" = "steamwebhelper"
"media.name" = "Playback"
"application.name" = "Chromium"
So far, I've been using my little mixer with great success. Using Rust on both sides definitively helped with software stability a lot. I'm looking forward to more "full stack Rust" projects in the future :)